Polymer Clay Moth Sculptures: A Four-Piece Collection
- Sep 16, 2025
- 3 min read
TLDR
This four-part moth sculpture series was inspired by a March 2025 Instagram illustration challenge hosted by @tinykatecreates and @suefield66. Using polymer clay, acrylic paint, mica powder, and crystal accents, I created four moths: Gaudy Sphinx, Diva Hemerophila, Ghostly Silk, and Chrysocale Regalis. This post shares my process, techniques, and what I learned while bringing each moth to life

Sculpting Moths in Polymer Clay
In early 2025, I set out to create a small series of moth sculptures in polymer clay. The idea came from an Instagram illustration challenge hosted by @tinykatecreates and @suefield66, which highlighted moth species from around the world. While many participants painted or drew, I decided to experiment with clay, translating the intricate beauty of moths into dimensional works of art.


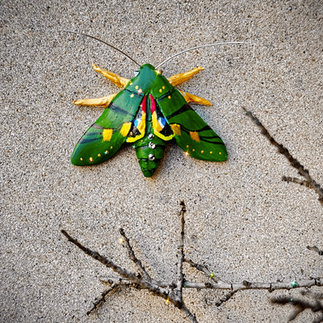
Week 1: Gaudy Sphinx Moth (Eumorpha labruscae)
Known for its vivid green and gold markings, the Gaudy Sphinx Moth was my pick for week one. I sketched thumbnails in my sketchbook to study color and pattern, then built the main body from green polymer clay. After baking, I layered acrylic paints in both matte and metallic finishes. The antennae were crafted from jewelry wire, which added movement and realism.
This piece was also my first experiment with Swarovski crystals. Tweezers were a lifesaver for precise placement... though I admit I lost a few crystals to the studio floor!


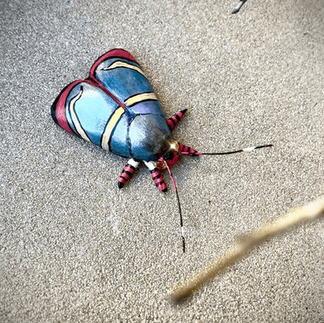
Week 2: Diva Hemerophila (Hemerophila diva)
The bold, jewel-like colors of the Diva Hemerophila made it an obvious choice for week two and inspired me to lean into sparkle. After forming the body from black polymer clay, I learned the importance of smoothing the clay before baking. I ended up sanding the surface, which can be hazardous without proper ventilation... so for future moths, I adjusted my approach.
Once baked, I painted the base in acrylic, added mica powder for shimmer, and finished with Swarovski crystal accents. A playful touch was hand-painting the antennae for extra vibrancy.


Week 3: Ghostly Silk Moth (Ceranchia apollina)
The Ghostly Silk Moth’s ethereal quality was both inspiring and challenging. I experimented with translucent clay to achieve a luminous effect, though its non-porous surface made painting tricky. Thin washes of acrylic gave the soft, ghostly finish I wanted.
For the antennae, I tried something new... micro scoring black paper to create delicate feathered textures. This added an elegant, airy detail that contrasted beautifully with the subtle body tones.


Week 4: Chrysocale Regalis
For the final week, I chose Chrysocale Regalis with its striking orange, yellow, and blue markings. Applying what I had learned earlier, I smoothed the clay before baking to avoid sanding afterward. Bright acrylic details, shimmering accents, and feathered paper antennae gave this moth a celebratory finish to close the series.


Lessons from the Series
Creating this collection pushed me to explore new materials and techniques. Some key takeaways:
Some takeaways:
Sculpting from a single piece of clay adds strength and stability
Smooth clay before baking rather than sanding after
Jewelry wire and paper make versatile antennae solutions
Mica powder and crystals bring dimension and sparkle
Translucent clay looks beautiful but is difficult to paint
The Finished Collection
Each moth sculpture was framed with its name and species, transforming the series into a cohesive collection. Together, the four pieces celebrate both the variety of moth species and the creative possibilities of polymer clay.
What began as inspiration from an online challenge became a deeply rewarding project that combined natural history, craft, and experimentation. The result is a collection I’m proud to display... one that continues to inspire me to explore the intersection of sculpture and nature.


👉 Check out the finished collection in motion on my Instagram reel!


Comments